Documentation
A quick guide to get started with
dataset generation
DATASET DESIGNER
DATASET FORMAT
IMAGE ENGINE CONTENT
Table of Contents
Dataset Designer
The “Designer” section of the AI Verse app is where the magic happens. It empowers users to craft and customize scenes with precision, specifying object arrangements, activity placements, camera positioning, and more.
Scene Contents
In the context of AI Verse’s dataset designer, “Scene Contents” plays a crucial role in defining what will be randomly added to the generated scenes. It allows users to control the objects and activities that appear in the dataset, tailoring it to their specific use case and requirements.
Located in the right pane of the app, the “Scene Contents” section consists of two tabs: “Objects” and “Activities.” Each tab presents collections of objects or activities, respectively, enabling users to create diverse and realistic random scenes.

Objects
The “Objects” tab within “Scene Contents” displays object collections as tiles, each with a single thumbnail and icons representing the categories that constitute the collection. These collections are created using the concept of “Randomized Object Collections” mentioned in the “Content” section, allowing for the placement of random objects interchangeably in scenes.
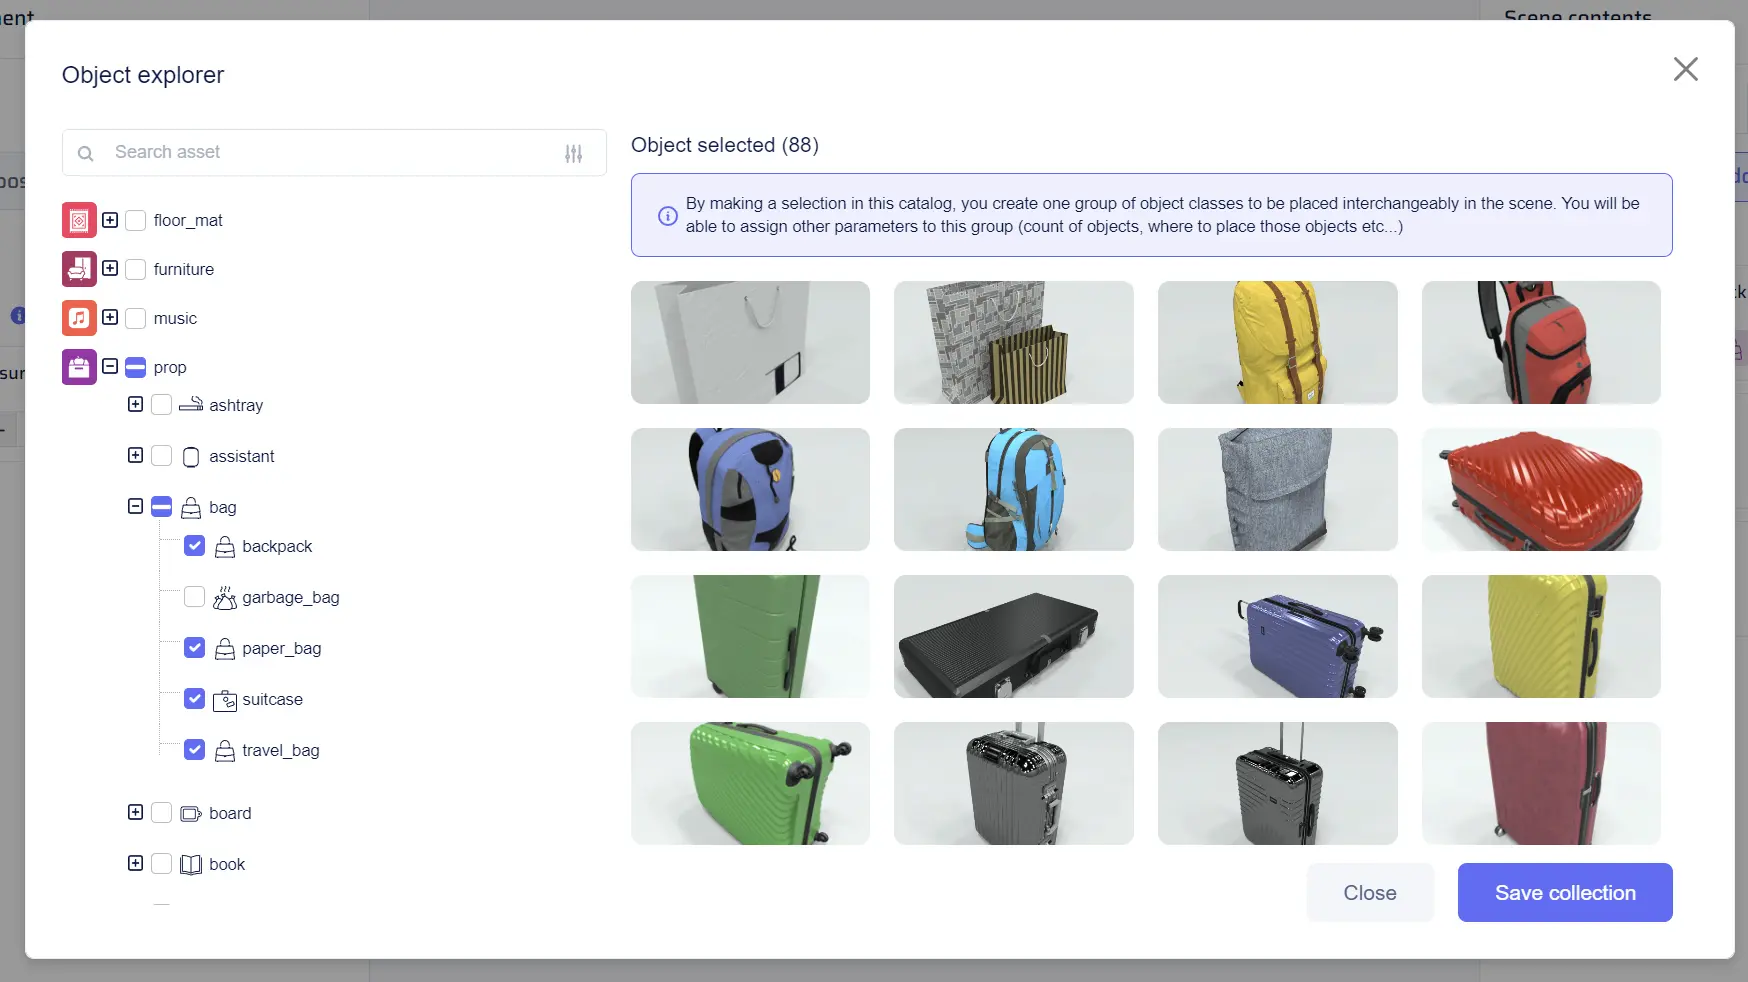
To add a new randomized object collection to a dataset, click on “Add object” under the “Objects” section of “Scene Contents.” This will open the object catalog, presenting a tree of checkboxes on the left side for selecting categories. Users can expand subcategories to refine their selection, and the right side of the window displays thumbnails reflecting the current selection. Additionally, a search bar enables users to filter the tree based on keywords. Once the desired objects are selected, click “Save collection” to create the new collection.
Collection Parameter Menu
This menu pops up when click on a collection tile, allowing users to adjust various parameters.
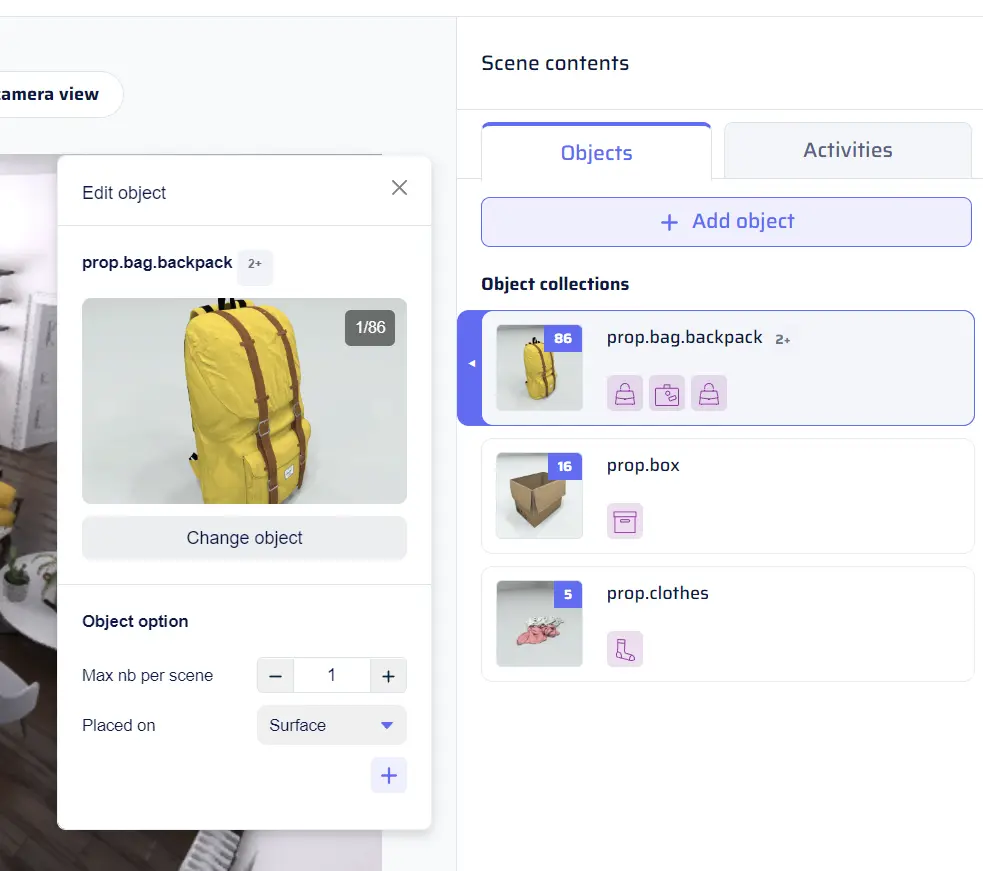
- Change Object: This option opens the object catalog, allowing users to modify the selection of categories within the collection.
- Max Number Per Scene: Users can set the maximum number of instances for this collection to appear in a single scene.
- Support Surface: If the objects in the collection are compatible with a support surface, this parameter allows users to specify support surface categories. By clicking the “+” button, a catalog similar to the object catalog will pop up, enabling the selection of support surface categories.
Activities
The “Activities” tab in the “Scene Contents” is akin to the “Objects” tab, but it represents activities to be included in the generated scenes. Activity collections are essential for generating dynamic scenes with actors engaged in various activities. To add a new randomized activity collection to a dataset, click on “Add activity” under the “Activities” section of “Scene Contents.” This will open the activity catalog, presenting a tree of checkboxes on the left side for selecting categories. Users can expand subcategories to refine their selection, and the right side of the window displays thumbnails reflecting the current selection. Additionally, a search bar enables users to filter the tree based on keywords. Once the desired activities are selected, click “Save collection” to create the new collection.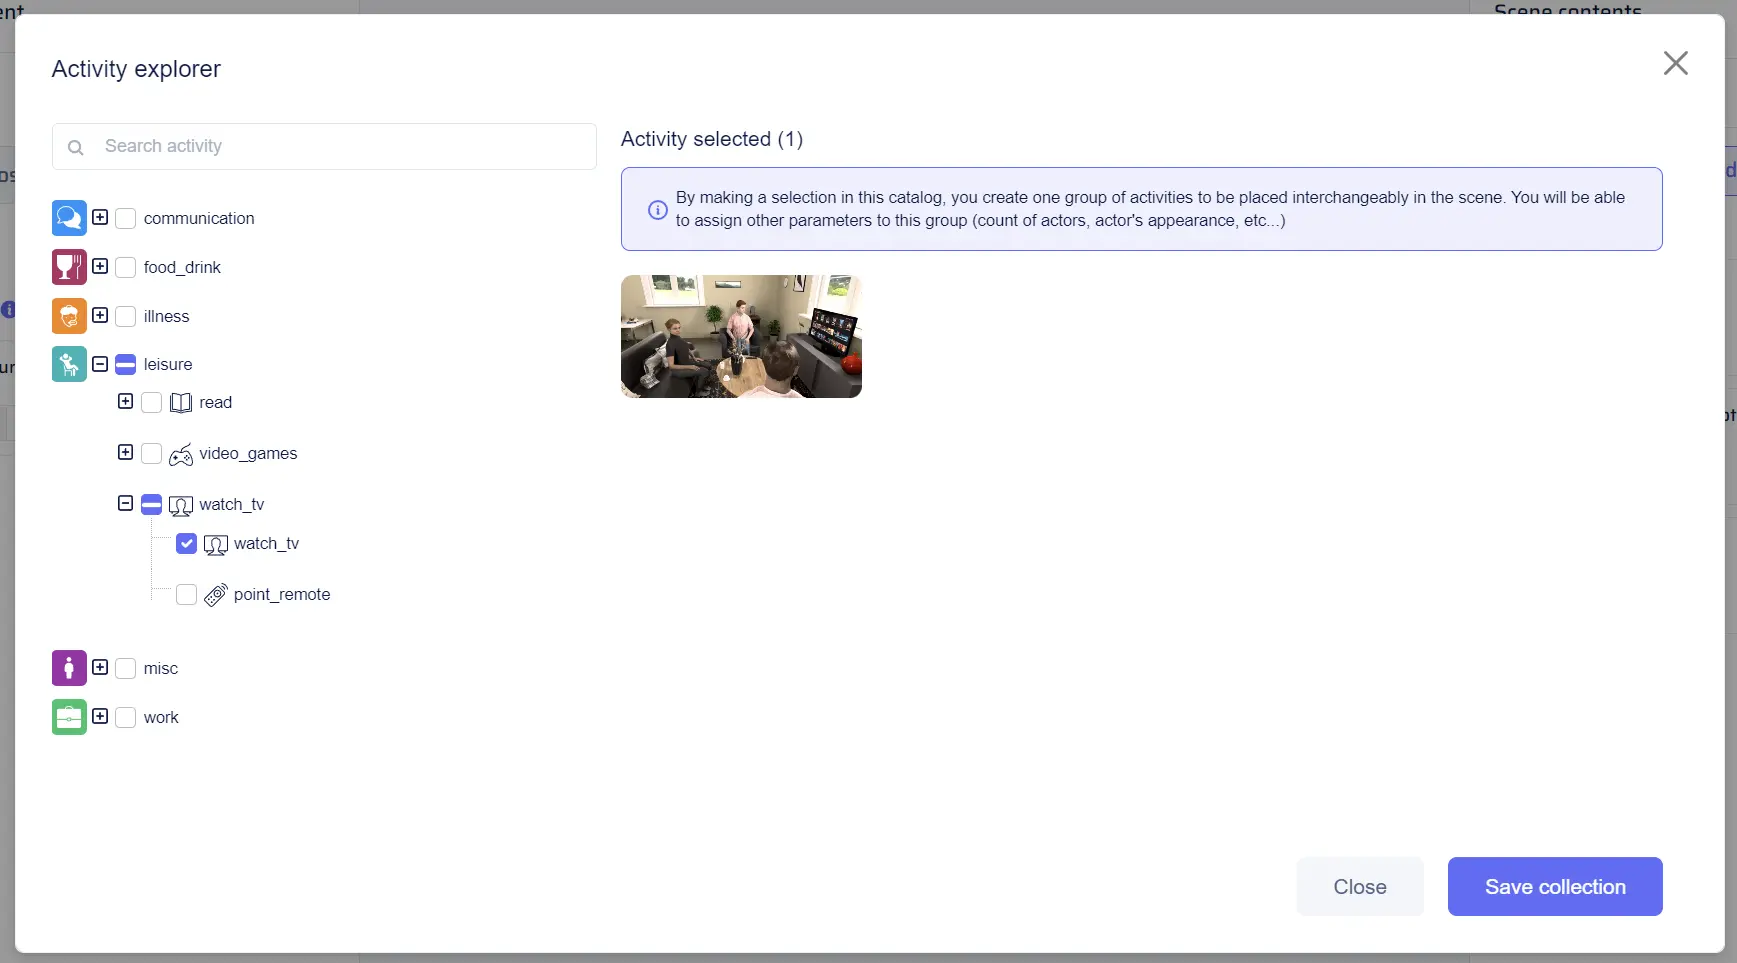
Activity Parameter Menu
- Max Actors: Users can set the maximum number of actors involved in the activity.
- Gender: This parameter allows users to select the gender of the actors performing the activity.
- Morphology: Users can choose the body type or morphology of the actors participating in the activity.
- Age Group: This parameter defines the age group of the actors engaging in the activity.
- Ethnicity: Users can specify the ethnicity of the actors involved in the activity.
- Facial Expressions: This parameter enables users to set specific facial expressions for the actors during the activity.
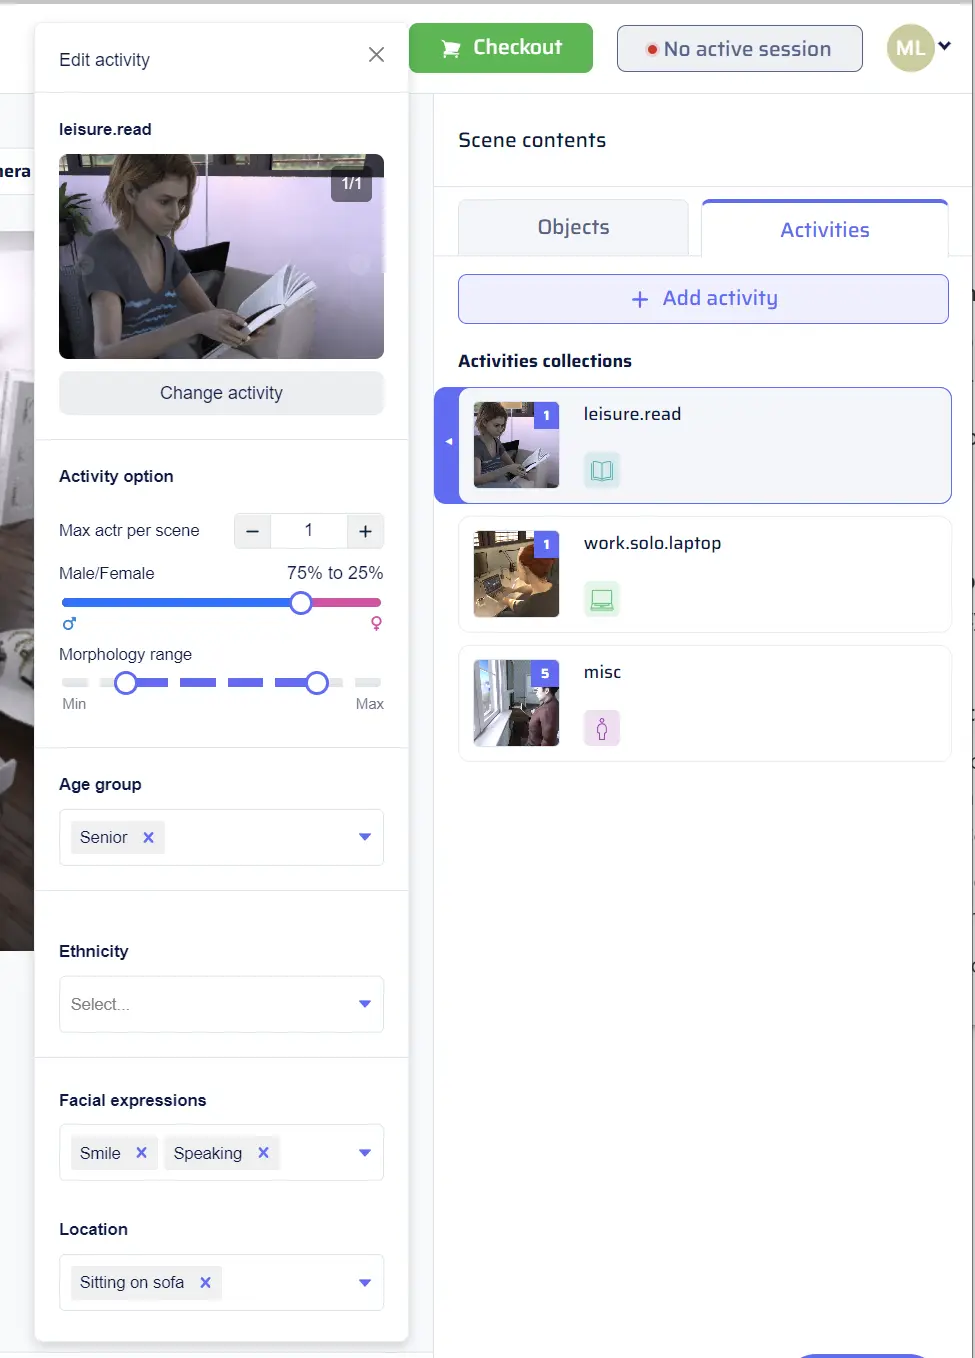
Activity Locations
Activity locations determine where the activities from the “Content” section will take place. Users can find a drop-down menu allowing them to select one or multiple specific locations for each activity, such as “Sitting at a desk,” “Standing,” or “Sitting in front of the TV.” If no specific location is chosen, the data generation engine will automatically utilize any location compatible with the selected activities, ensuring a diverse range of settings in the generated scenes. It’s essential to note that the available activity locations are dynamically filtered based on the current environment, as defined in the “Environments” section. This ensures that only suitable locations are presented, maintaining coherence and realism when creating scenes in different environments.Camera Placement
Accurate and controlled camera positioning is crucial to capture the desired perspective for synthetic data. The camera placement menu is located in the left pane and can be accessed by clicking on the Camera placement icon in the toolbar on the left side of the app. The first choice to make is the Camera mode, which affects the way the camera is placed in the scene and determines the rest of the parameters shown in the camera placement section. There are three options available in the drop-down: Freespace mode, Object POV, and Activity POV.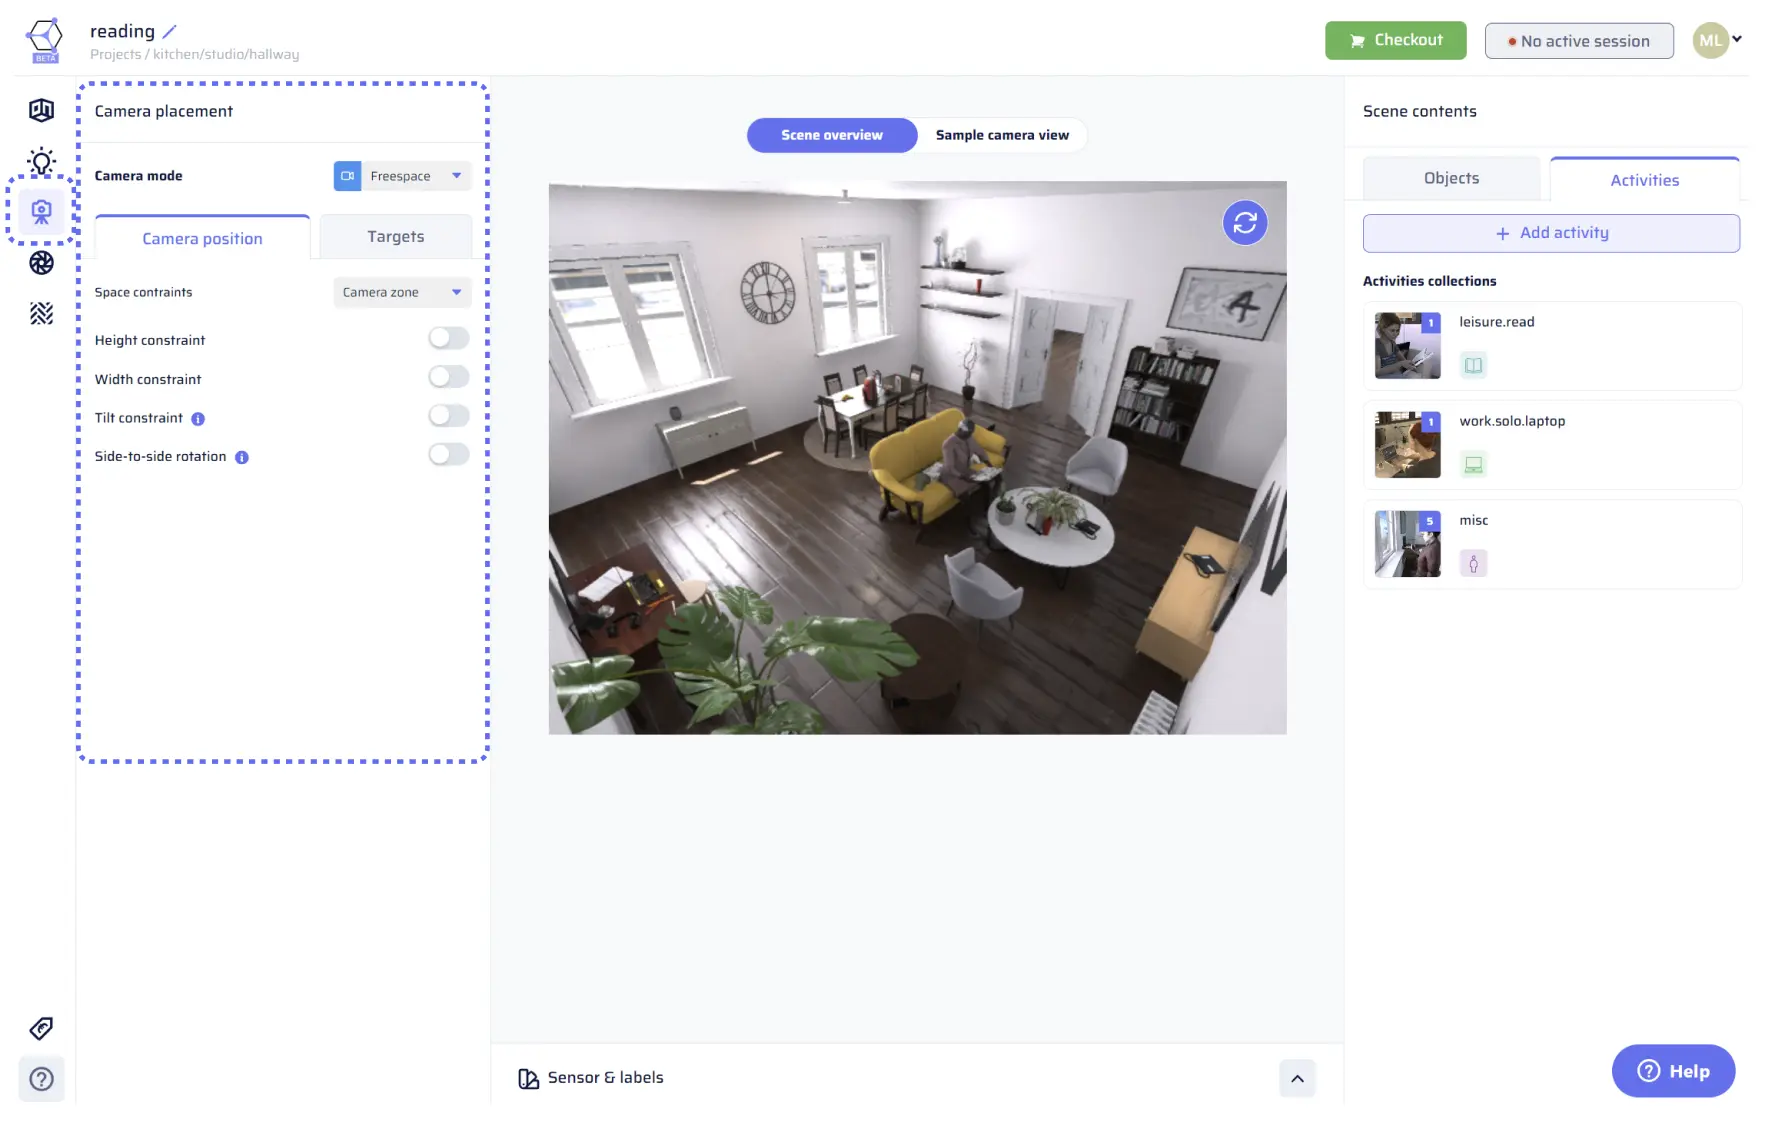
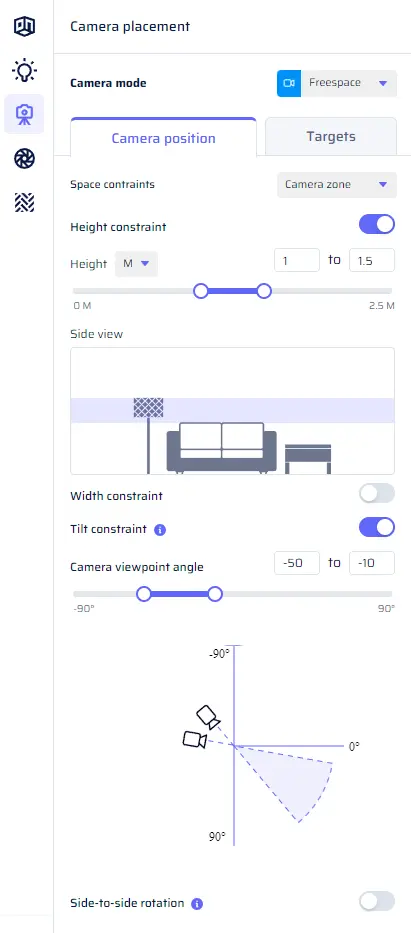
Freespace mode
In this mode, the camera is placed anywhere in the scene (i.e., free-flying) while respecting constraints that you define for its position and rotation (see below). Additionally, you can choose to focus on specific objects or activities from “Scene contents,” which means the camera will also position itself to include instances from those collections (categories) in the captured image.Camera positioning tab
In this tab, you can define constraints on how the camera is placed in the scene. There are two modes to choose from:- Camera zone: In this mode, the constraints are defined with respect to the room’s layout.
- Height and width constraint: Adjust how high the camera is and how close or far away it is from the walls. Use double sliders for minimum and maximum values, either in meters or as a percentage of the room dimensions.
- Tilt constraint: Set how far up or down the camera can rotate. For example, you can simulate a robot on wheels by constraining the camera to look at a fixed tilt angle. Use a double slider for minimum and maximum values in degrees.
- Camera roll: By default, there is no camera roll (rotation around the optical axis). If needed, you can add a range for camera roll using double sliders for minimum and maximum values in degrees.
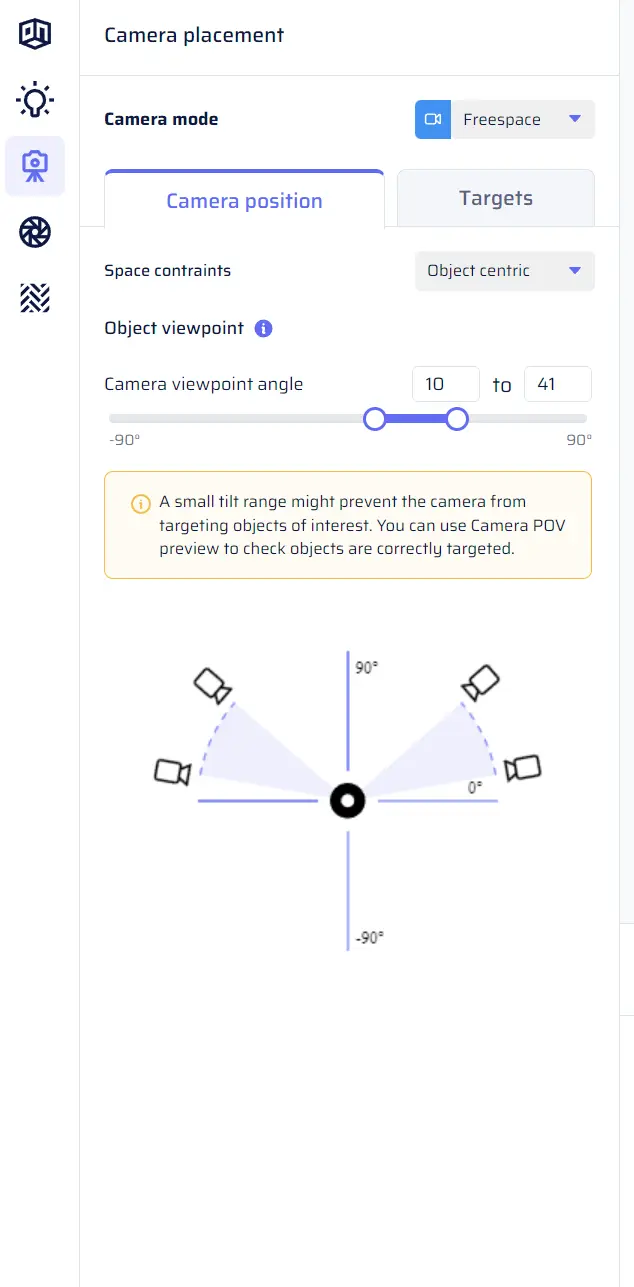
- Object-centric: In this mode, the constraints are defined with respect to the target object.
Define an elevation range (90 degrees: looking down from the top, 0 degrees: looking at the target in a horizontal plane).
Note that in object-centric mode, you define an elevation with respect to the object, and you do not control the zone of the room in which the camera is placed. This is to avoid incompatible constraints, such as looking at the top of a chair while forcing the camera to be close to the ground.
Use a double slider for minimum and maximum values in degrees.
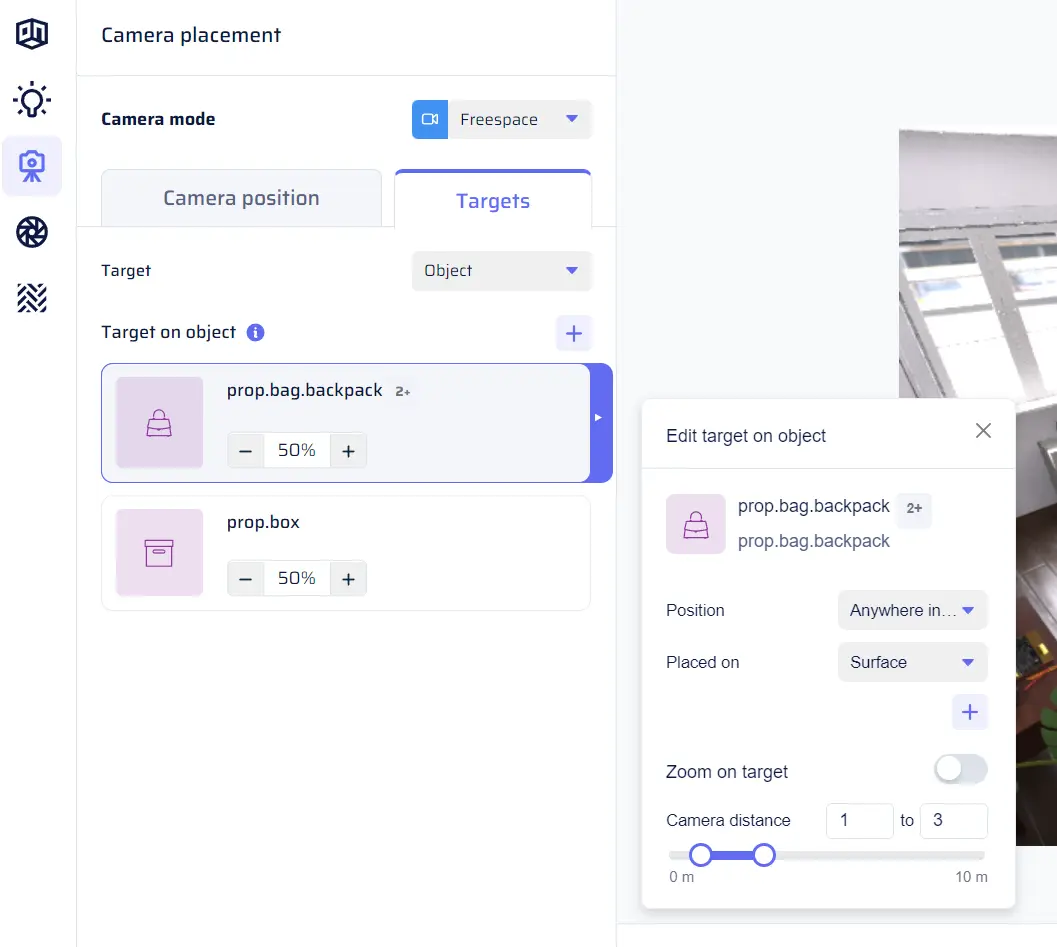
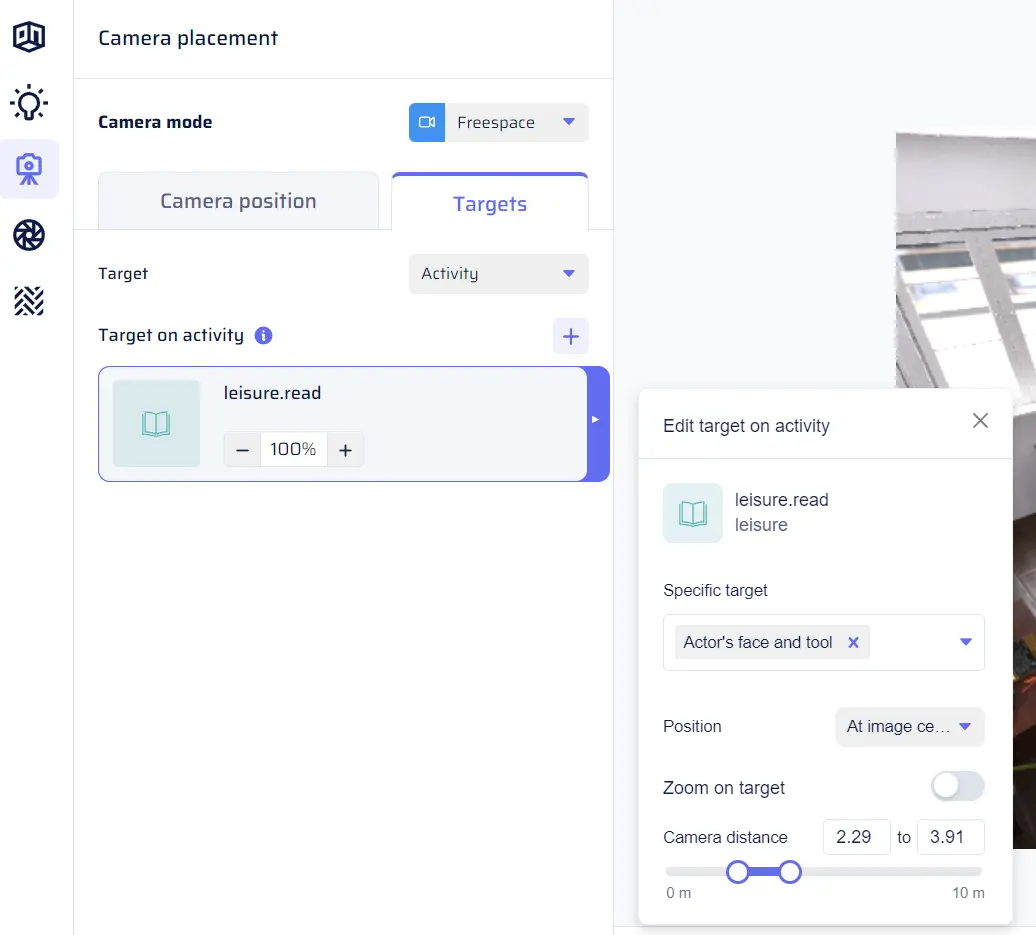
Targets tab
In this tab, you can specify target objects or activities for the camera. The camera will place itself to ensure that these targets are visible in the image. Targeting is useful for certain use cases, such as including specific objects in the image or ensuring certain activity classes are captured. You can choose between Object targets and Activity targets in a drop-down menu. The targets appear as tiles, and you can add a target by clicking the “+” button. A menu pops up, showing options from “Scene contents.” If the desired target is not present in the options, you can add it to “Scene contents” first by clicking on “Add missing.” Alternatively, you can follow the steps to add a collection or activity to “Scene contents” (see the “Scene contents” section). Parameters menu for a given Object target:- Position in image: Choose from the drop-down whether the object should appear “At image center” or “Anywhere in the image.”
- Support surface: If the object can be present on multiple support surfaces, you can use the object catalog to define a support surface for the target. This hint helps with camera placement, attempting to target the object when it is placed on the selected support surface(s). However, this is not guaranteed.
- Distance / Zoom on target: Use the switch to choose whether to control the camera’s distance to the object or “object zoom.”
- Distance: Use a double slider to set the minimum and maximum camera distance in meters.
- Object zoom: In this mode, control the proportion of the image that the target bounding box takes. Use a double slider to set the minimum and maximum object zoom values as a percentage of the image dimensions. Note that object zoom can be more than 100%, in which case the target bounding box can be larger than the image dimensions, and the image is zoomed on a part of the object.
Parameters menu for a given Activity target tile
For each activity selected as Activity POV, you can customize certain parameters to control the camera’s perspective of the activity.
- Specific target: Choose which part of the activity the camera should focus on from a multi-select menu. Options may include “Actor’s body,” “Actor’s face,” “Activity tool,” and “Wide shot.” When multiple options are selected, the camera will randomly choose one option for each view targeting this activity.
- Position in image: Select from the drop-down menu to determine where the activity should appear in the image, similar to Object targets.
- Distance / Zoom on target: Adjust the camera’s distance to the activity or apply object zoom, just like for Object targets.
Multiple targets
You can select multiple activities or multiple objects as targets, with one tile per target (and one menu of options, as described above, per target). Additionally, you can assign percentages to each target, determining how often the camera will focus on a given target during dataset generation. The targets are automatically updated when objects are changed or removed from “Scene contents.” Similarly, the targets are updated when switching environments, as this affects the contents available in “Scene contents.”Object POV mode
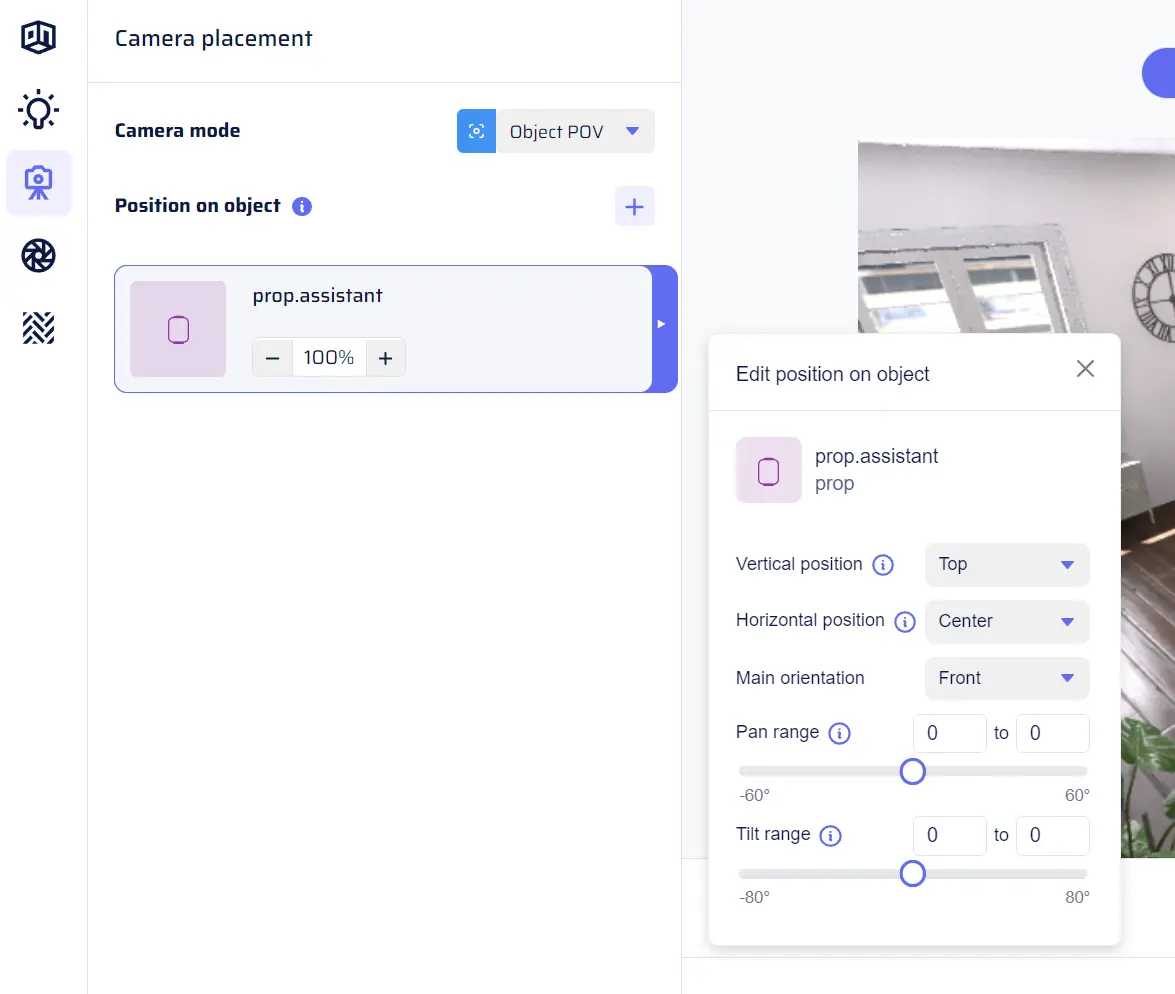
In this mode, the scene is captured from the point of view of a selected object. The camera is placed on the object itself, allowing for unique and dynamic perspectives. When “Object POV” is selected in the Camera mode drop-down, the Camera placement section displays a list of tiles, each representing an object selected as an Object POV option. The camera will be placed directly on the corresponding object.Adding an object as Object POV
To add an object as Object POV, you can use a similar mechanism as selecting targets. If the object class you want to use as Object POV is not available in the menu to add a new Object POV option, you need to first add it to “Scene contents.” You can click on “Add missing to Scene contents,” and a catalog will pop up with the result of your selection added as an object collection to “Scene contents.” Once the object is available in “Scene contents,” you can select it from the menu, and it will be added as a tile in the Camera placement section.Parameters menu for a given Object POV tile
For each object selected as Object POV, the parameters menu offers options to fine-tune the camera’s placement on that object.- Vertical / horizontal position (of the camera on the object): Choose from simple options in drop-downs, such as “Top,” “Center,” or “Bottom” for the vertical position and “Forward,” “Left,” or “Right” for the horizontal position.
- Main orientation of the camera (i.e., main rotation): Select from a drop-down, with options like “Forward,” “Left,” or “Right.”
- Pan / tilt range (rotation around the main orientation of the camera): Use double sliders to adjust the minimum and maximum pan and tilt angles. Pan controls the rotation left or right, and tilt controls the rotation up or down.
Activity POV mode
In Activity POV mode, the scene is captured from the point of view of a person performing an activity. The camera is placed on the head of the actor, simulating the perspective of someone engaged in the specified activity. This mode operates differently from targeting activities in Freespace mode, and the parameters menu for a given Activity POV tile only includes the probability distribution.
Adding an activity as Activity POV
Adding an activity as Activity POV follows the same mechanism as adding objects as Object POV. If the activity class you want to use is not available in the menu to add a new Activity POV option, you need to first add it to “Scene contents” by clicking on “Add missing to Scene contents,” and the corresponding catalog will pop up. Next, follow the steps to add a collection or activity to “Scene contents” (as described in the “Scene contents” section). Once the activity is available in “Scene contents,” you can select it from the menu, and it will be added as a tile in the Camera placement section.Parameters menu for a given Activity POV tile
For each activity selected as Activity POV, you can customize certain parameters to control the camera’s perspective of the activity.- Probability distribution: Adjust the probability of each activity to control how often the camera will focus on that specific activity during dataset generation.
Camera intrinsics
The Camera Intrinsics section allows you to fine-tune the internal parameters of the camera, giving you precise control over the characteristics of the images captured within your scenes. These parameters, collectively known as “intrinsics,” influence how the camera interacts with the scene and ultimately affect the visual quality and realism of your synthetic data. To access the Camera Intrinsics menu, click on the Camera placement icon in the toolbar on the left side of the app.Understanding camera intrinsics
Camera intrinsics refer to the internal properties of the camera that determine how it projects a 3D scene onto a 2D image plane. While camera placement focuses on the position and orientation of the camera within the scene, camera intrinsics dictate aspects like field of view, resolution, exposure, depth of field blur, and motion blur.
Adjusting Intrinsics Parameters
In the Camera Intrinsics menu, you have the ability to adjust the following parameters:
Resolution
The resolution parameter governs the image dimensions and quality. You can choose from preset options like VGA or XGA, or opt for a custom resolution to cater to specific project requirements. It’s important to note that custom resolutions are subject to pricing adjustments, with the price per image influenced by the number of pixels in each image.
Field of View (FOV) Angle
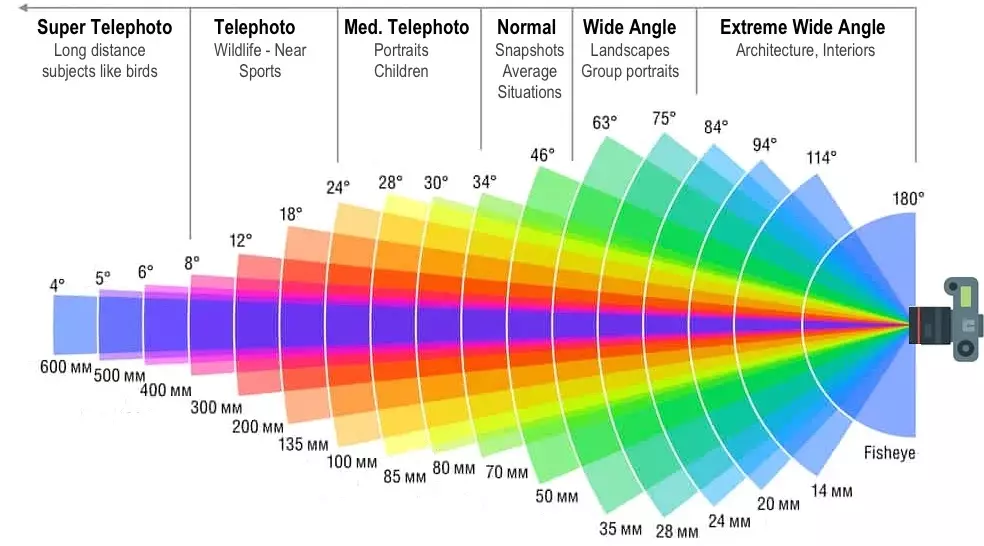
The FOV angle defines the width of the camera’s field of vision. It determines how much of the scene is captured within the image. The FOV angle is connected to the image width and focal length in pixels through the following formulas:
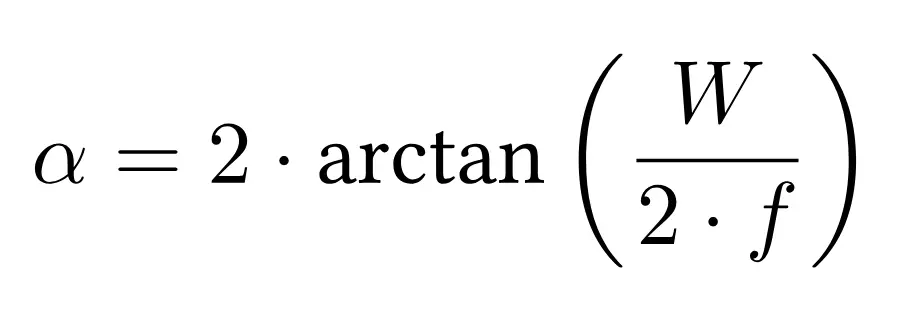
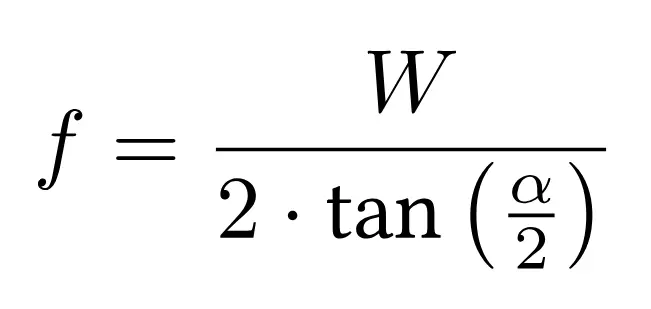
where f is the focal length, W the image width, and $\alpha$ the FOV angle.
Use a double slider to set the smallest and largest FOV angles the camera can have. This means your images can have random FOV angles that go from the lowest to the highest values you’ve chosen. You can either simulate a specific given focal length (or FOV angle), or select a range to cover various use cases with varying zooms and lenses.
Exposure
Exposure settings allow you to control the overall brightness of the captured images. You can choose from three exposure levels: “Under-exposed,” “Normal,” and “Over-Exposed,” tailoring the visual appearance of the synthetic data to your preferences.
Depth of Field Blur
Depth of field blur simulates the effect of a camera’s aperture, resulting in a focus on certain objects while blurring the rest. You can select from options like “No blur,” “Low,” “Mid,” or “High” to determine the amount of blur applied. When depth of field blur is active, an additional setting becomes available: “Depth of Field Focus.” This setting lets you choose whether the camera’s target (as defined in Camera Positioning parameters) remains in focus or is intentionally blurred, allowing for creative control over the image composition.
Motion Blur
Motion blur adds a sense of motion and realism to images by simulating camera movement. Six double sliders are provided to set the range of motion for horizontal side motion, vertical motion, forward/backward motion (in centimeters), as well as tilt, roll, and pan small rotations (in degrees). When motion blur is enabled, camera view previews and dataset images are computed with randomized motion blur values within the specified ranges, introducing a dynamic element to the generated data.
Scene lighting
Lighting sets the mood and helps your synthetic scenes match the real world. If you’re training a computer to understand images, it needs to see images in different lighting conditions, just like we do. This section lets you control how the light behaves, from the sun’s position to how bright or warm it is. This means you can mimic a sunny day, a dim room, or even a night with lamps. The “Scene Lighting” section, easily accessible through the lightbulb icon in the left toolbar, empowers you to orchestrate lighting scenarios that infuse your generated data with context and variation.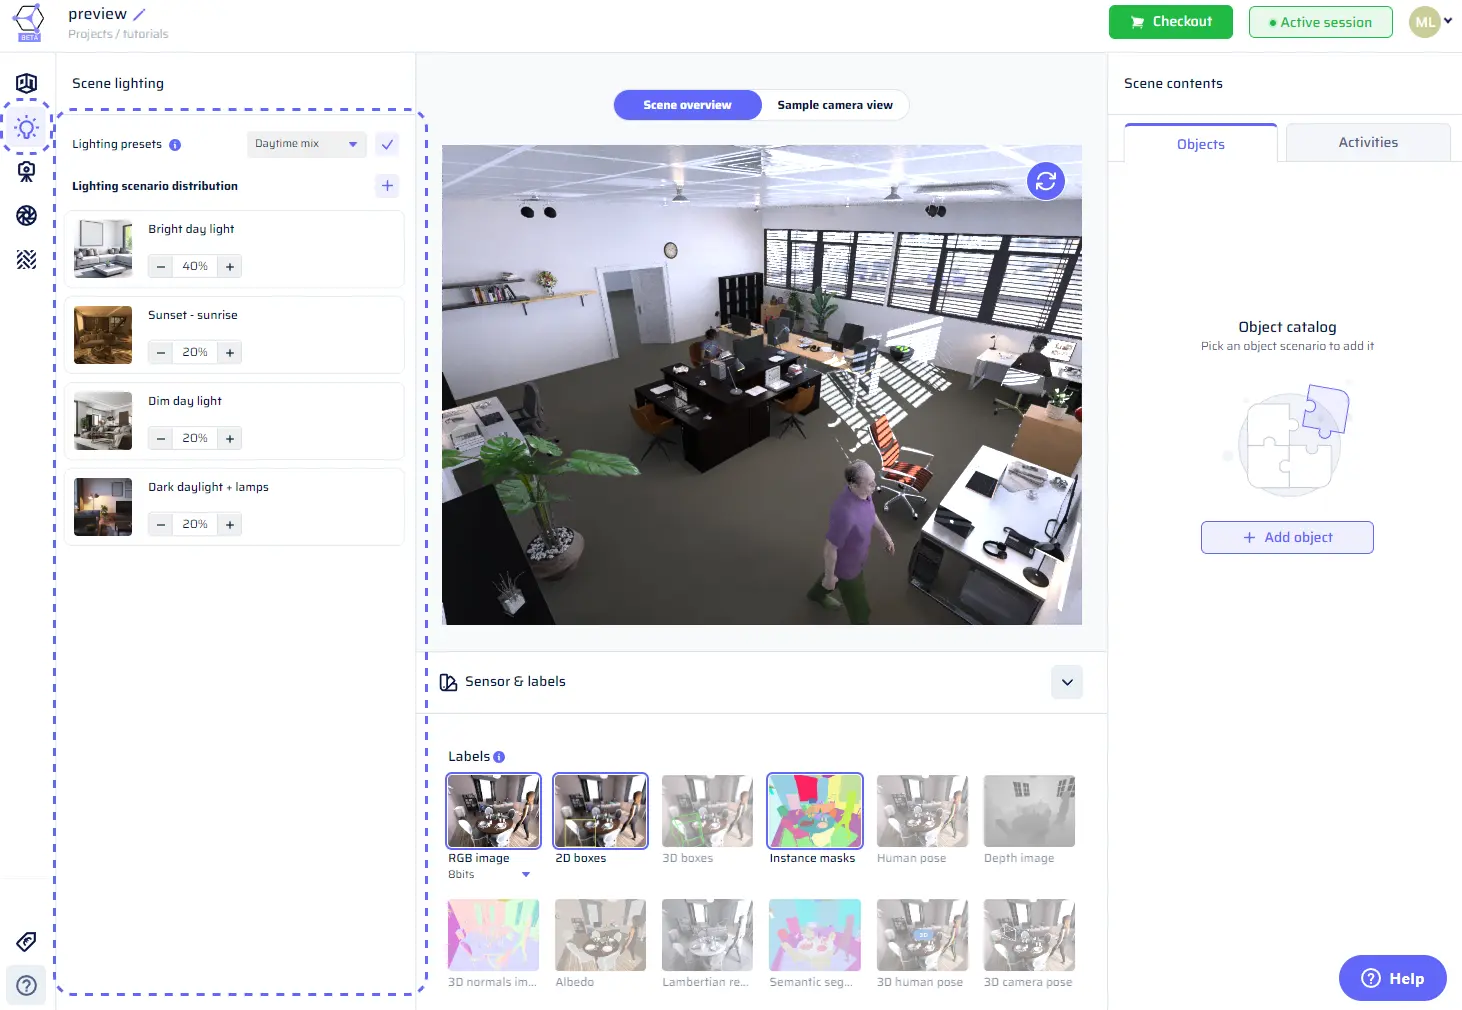
Understanding Lighting Scenarios
What is a Lighting Scenario?
A lighting scenario encapsulates the lighting conditions within a scene. It’s a recipe for how light interacts with your synthetic environment, comprising the following parameters:
- Sun Position Range: Specifies the range of positions for the virtual sun in the sky.
- Intensity Range: Governs the brightness of the light sources, from soft to intense illumination.
- Warmth Range: Determines the color temperature of the light, influencing the ambiance of the scene.
- Ceiling Lights: Mimics the presence and effects of ceiling-mounted light sources.
- Artificial Lights: Introduces additional light sources, further shaping the scene’s illumination.
Benefits of Using Lighting Scenarios
Crafting and deploying lighting scenarios serves two primary purposes:
- Specific Use Cases: You can model precise scenarios, like training an object detector in low-light conditions or testing a model’s performance in environments with intense artificial lighting.
- Dataset Variety: Lighting scenarios diversify your datasets. Variation aids model generalization, enabling AI systems to perform well across a spectrum of lighting conditions.
Manipulating Lighting Scenarios
To start, access the lighting section by clicking on the lightbulb icon in the toolbar. You’re presented with a dropdown for quick preset selection and a list of lighting scenarios shown as tiles.
- Adding Scenarios: Extend the array of lighting scenarios by selecting options from the catalog. Click the “+” button, and the scenario catalog opens up. The catalog encompasses a rich array of scenarios, such as Bright Day Light, Dim Day Light, Night (Ceiling Lights), Night (High Contrast Shadows), Night (Lamps On), Dark Daylight + Lamps, Sunset/Sunrise, and Camera Flash.
- Adjusting Percentages: The scenario tiles exhibit scenarios that constitute the distribution. Modify the percentages for each scenario using the input on the respective tile. When you tweak one scenario’s percentage, the others recalibrate automatically to maintain a total of 100%.
- Randomized Scene Illumination: During dataset generation, each scene takes on a random lighting scenario drawn from the distribution you defined.
Multi-Scenario Presets
At the pinnacle of the lighting section, a dropdown showcases a set of multi-scenario presets, pre-arranged distributions with meaningful percentages.
- Quick Beginnings: To use a preset, just pick it from the dropdown and click the checkmark icon. This will completely change the distribution right away, so you can get started quickly.
Previews
In the Dataset Designer, previews offer you a quick glance into the world you’re crafting, letting you visualize scenes and images before fully generating your dataset. Let’s delve into how previews work and the tools at your disposal.What Happens When You Preview?
Initiating a preview engages a behind-the-scenes dance of scene assembly and real-time GPU rendering. This process swiftly generates an image, taking mere seconds. As you click on the preview window, you’ll notice a spinner indicating that the preview is being prepared.
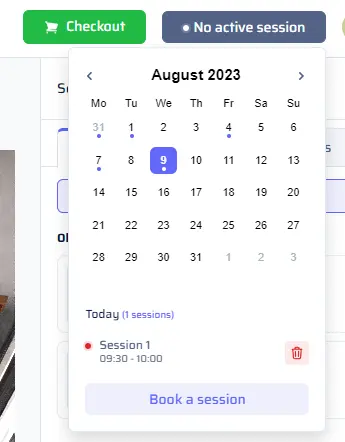
Sessions for Previews
Why Sessions? Previews are powered by our GPU render farm in the cloud. To ensure smooth and timely previews, each user gets a dedicated session on a GPU machine. Sessions are available in time slots, typically every half hour.- Walk-In Policy: If there are available sessions when you click preview, one is assigned to you instantly. You can enjoy the GPU power until the current slot ends, and it’s automatically reserved for you.
- Booking a Session: For planning ahead, use the calendar to book sessions up to a week in advance. Simply select your desired time slots (up to 20), and they turn red to signify your reservations.
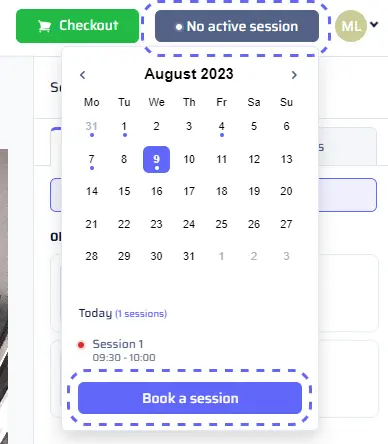
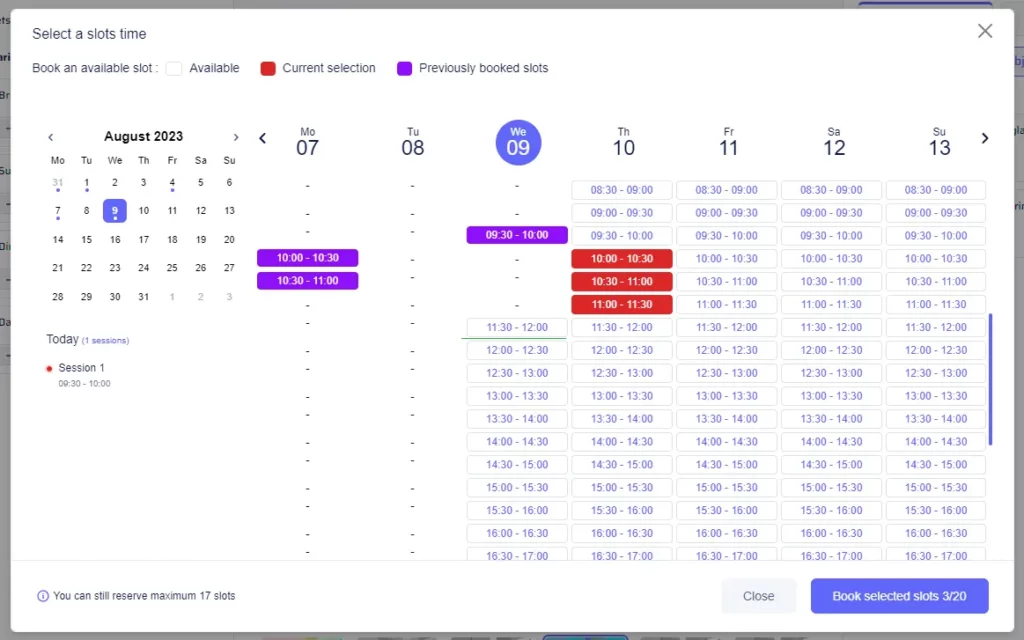
- Cancelling a Session: Check your upcoming sessions by clicking the “Session Status” button on the top-right. Each booked session has a dot under its corresponding date. Click on a date to see sessions, and delete any unwanted sessions with a simple click on the trash button.
Scene Overview vs. Sample Camera View
Scene Overview: This is akin to the bird’s-eye view, captured from a top corner of your virtual room. It’s your chance to observe the scene’s composition, including objects and activities. However, it doesn’t directly match an image produced in your dataset.
Sample Camera View: Picture this as your camera’s perspective. It’s an image captured from a random camera placement that adheres to the constraints and parameters you’ve set in the Camera Positioning section.

Preview Specific Options
Previewing Lighting Scenarios: Sometimes, you want to peek at specific aspects of your dataset. When a batch includes a distribution of lighting scenarios, you can see how a particular scenario pans out. To do this, head to the Scene Lighting section, hover over a lighting scenario tile, and click on the eye icon. This updates the Scene Overview preview, giving you a glimpse of a random scene under that lighting condition.

Previewing Single Targets: When dealing with multiple targets in Freespace mode, each image captures one random target from the distribution. To assess how a specific target looks, open the Camera Positioning section, hover over the target’s tile, and click the eye icon. This updates the Sample Camera View preview, revealing a random image with the camera aimed at the chosen target.
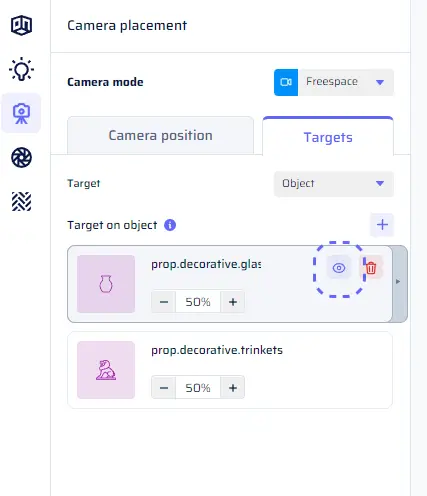
Table of Contents
Dataset Format
When you configure and order datasets through AI Verse’s web app, you’re opening the door to a wealth of synthetic annotated data to supercharge your computer vision deep learning models. Whether you’re tackling object detection, semantic segmentation, depth estimation, 3D reconstruction, navigation, or other tasks, understanding the dataset format is key. In this section, we’ll delve into the nuts and bolts of the dataset structure, giving you the insights you need to seamlessly integrate our data into your training pipelines.Scene Folder Structure
Our engine generates datasets in a structured manner, where each dataset folder consists of multiple scene folders. A scene folder represents a synthetic 3D scene and contains the generated images and associated metadata files. The scene folder structure typically consists of the following files:scene_instances.json: A JSON file containing the metadata and annotations for the scene, including information about images, 2D object instances, 3D boxes for instances, and 2D/3D pose for humans.beauty.XXXX.png: The rendered RGB image of the scene for a specific view, whereXXXXrepresents the view identifier.beauty_16bit.XXXX.exr: A high dynamic range (HDR) version of the rendered image in OpenEXR format.depth.XXXX.png: The depth map of the scene for the specific view, indicating the distance of each pixel from the camera. Pixel values are 255*0.5/d, where d is the distance in meters.depth_16bit.XXXX.exr: A high-precision depth map in OpenEXR format. Pixel values are 255*0.5/d, where d is the distance in meters.normal.XXXX.png: An image encoding the surface normals of the scene for the specific view.color.XXXX.png: An albedo image representing the color or reflectance properties of the scene for the specific view. The albedo image provides information about the intrinsic color of objects in the scene, disregarding lighting effects and shadows.lighting_only.XXXX.png: An image representing the scene with only the lighting information.
Semantic segmentation
subclass.XXXX.png: An image indicating the subclass labels for the objects/humans present in the scene for the specific view.class.XXXX.png: An image indicating the class labels for the objects/humans present in the scene for the specific view.superclass.XXXX.png: An image indicating the superclass labels for the objects/humans present in the scene for the specific view
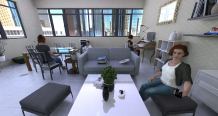
RGB Images
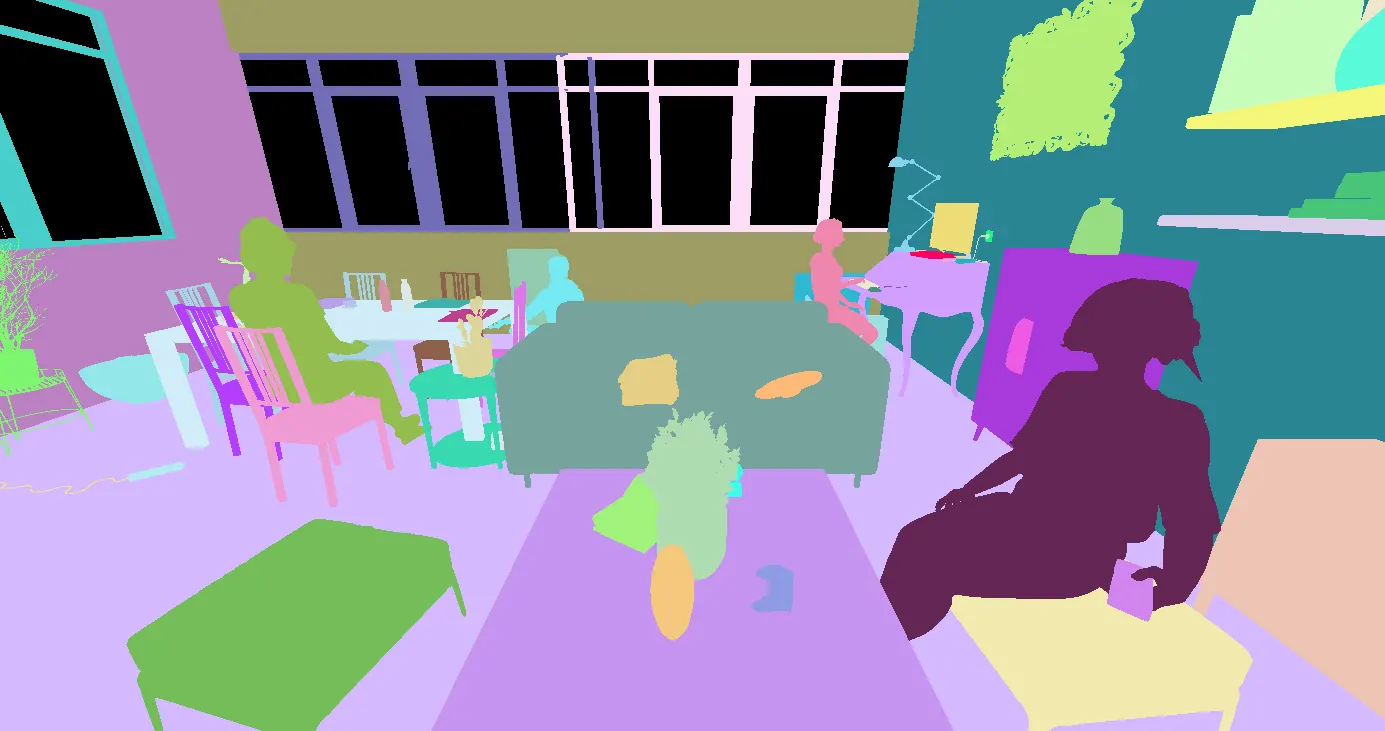
Semantic Segmentation

Lighting

Depth
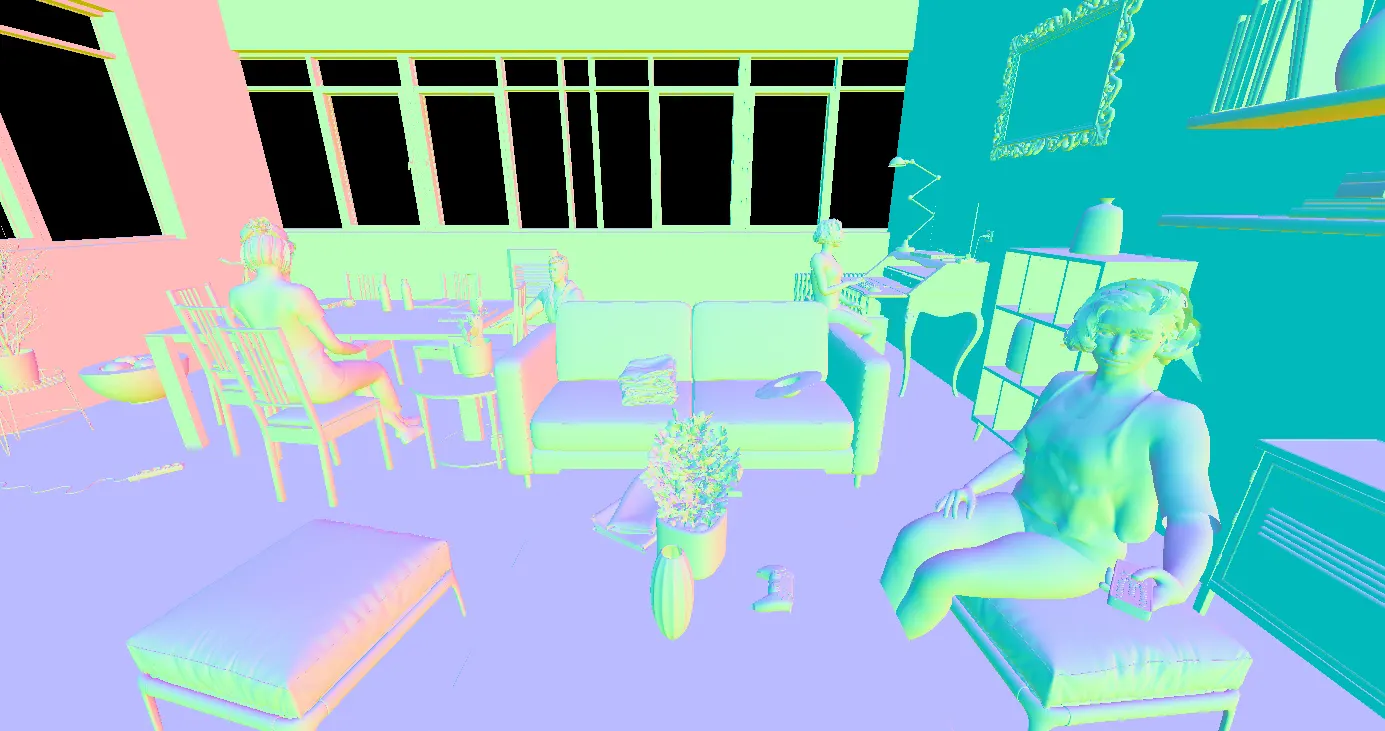
Normals
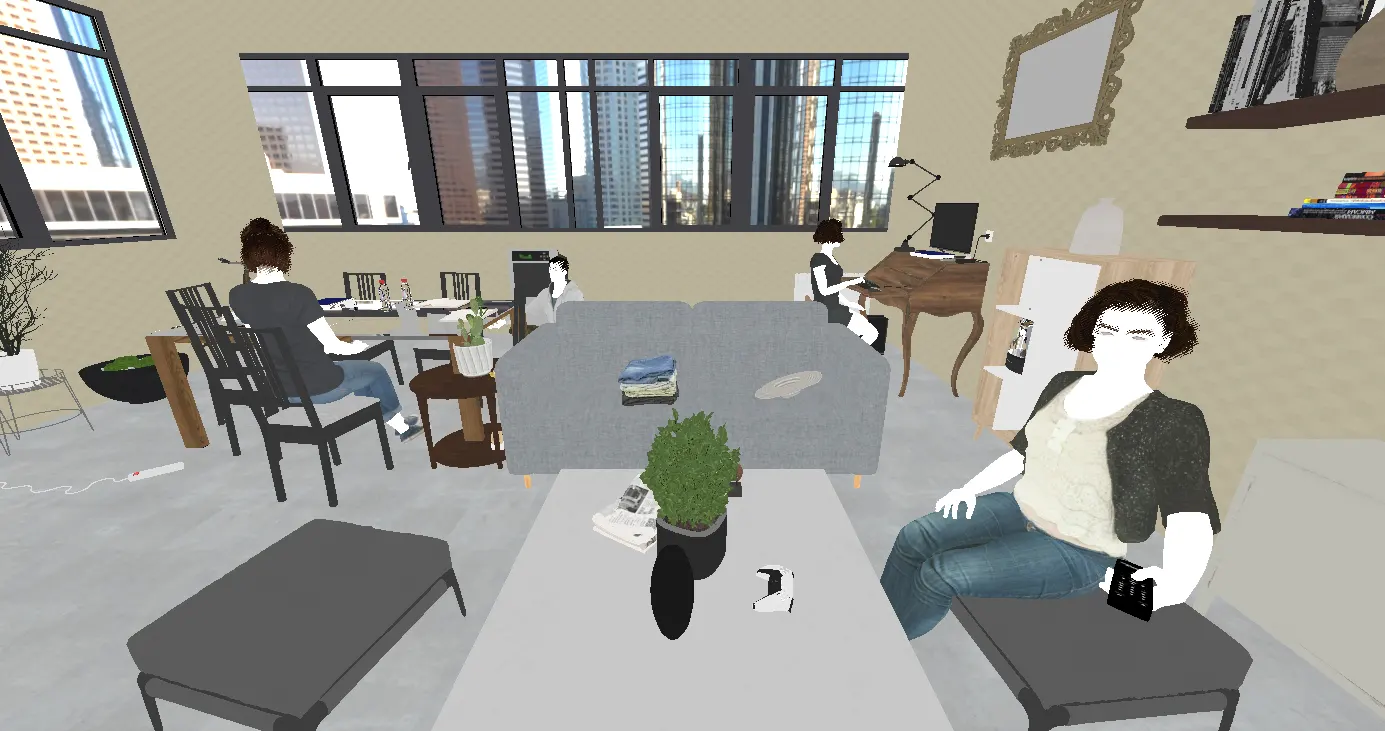
Albedo
Scene Annotation File
Thescene_instances.json file provides detailed metadata and annotations for the synthetic scene. It consists of the following sections:
Images
The “images” section contains information about each generated image in the scene. Each image object contains the following attributes:id: A unique identifier for the image.file_name: The filename of the image.height: The height of the image in pixels.width: The width of the image in pixels.camera_params: Camera parameters for the view, including resolution, intrinsic parameters, pose, and matrix mode.
Camera Parameters (camera_params)
The camera_params object provides information about the camera used to capture the scene view. It contains the following parameters:
resolution: A 2-element array representing the resolution of the camera in pixels [width, height].intrinsics: An array containing the intrinsic camera parameters. The parameters are typically represented as [fx, fy, cx, cy, skew], where:fxandfyare the focal lengths of the camera in the x and y directions, respectively.cxandcyrepresent the principal point (the center of the image) in pixel coordinates.skewrepresents any skew between the x and y axes of the camera.
pose4x4: A 16-element array representing the camera pose as a 4×4 transformation matrix. The matrix is typically represented in row-major order and contains the rotation and translation components of the camera pose.pose: A 7-element array representing the camera pose as [tx, ty, tz, qx, qy, qz, qw], where:tx,ty, andtzrepresent the translation components of the camera pose.qx,qy,qz, andqwrepresent the quaternion components of the camera rotation.
2D / 3D BOXES
2D / 3D HUMAN POSE
2D Instances
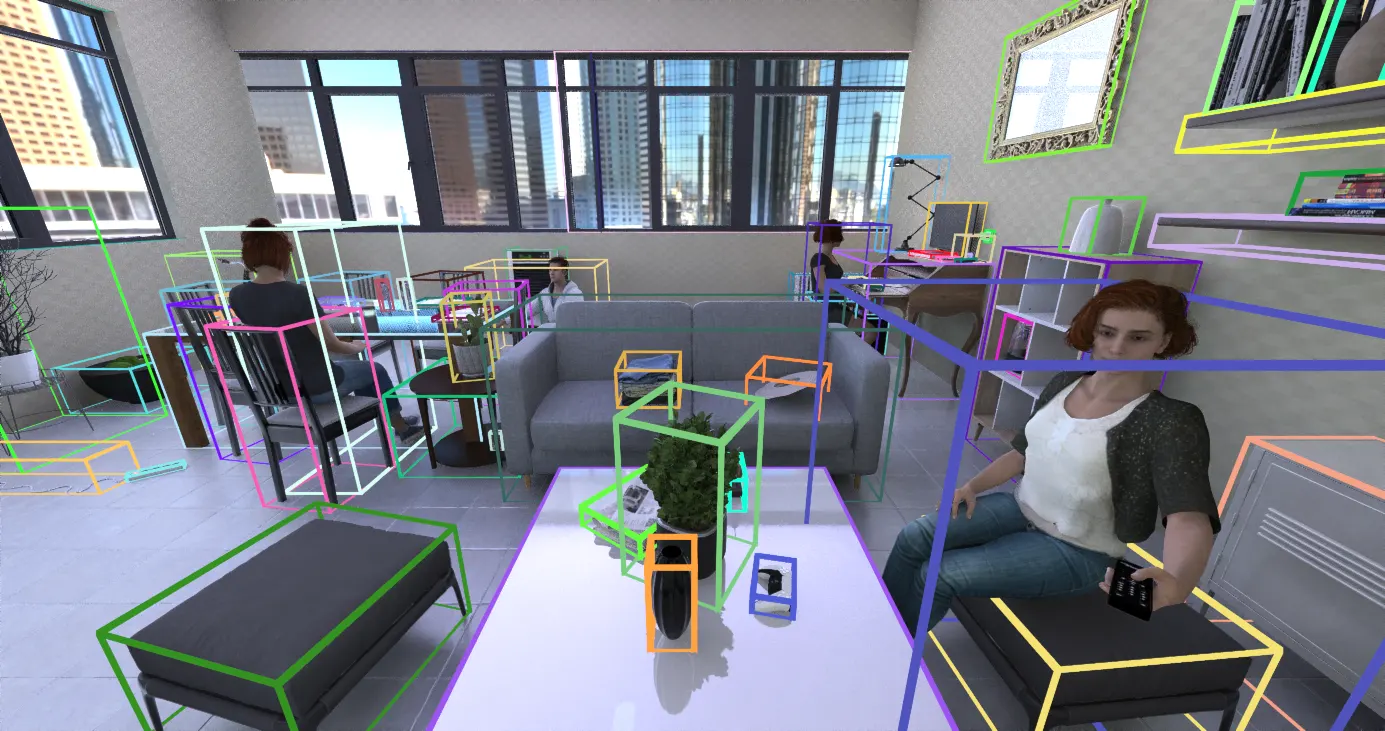
The “instances” section provides information about individual 2D object instances present in the views. Each instance object contains the following attributes:image_id: The identifier of the image to which the instance belongs.path: The path of the object instance in the taxonomy.area: The area of the instance in the image.superclass: The superclass label of the instance.class: The class label of the instance.subclass: The subclass label of the instance.bbox: The bounding box coordinates [xmin, ymin, xmax, ymax] of the instance in the image.segmentation: The COCO-style polygonal segmentation mask of the instance.box_3d_id: The identifier of the corresponding 3D box in the “instances_3d” section.
Human instances
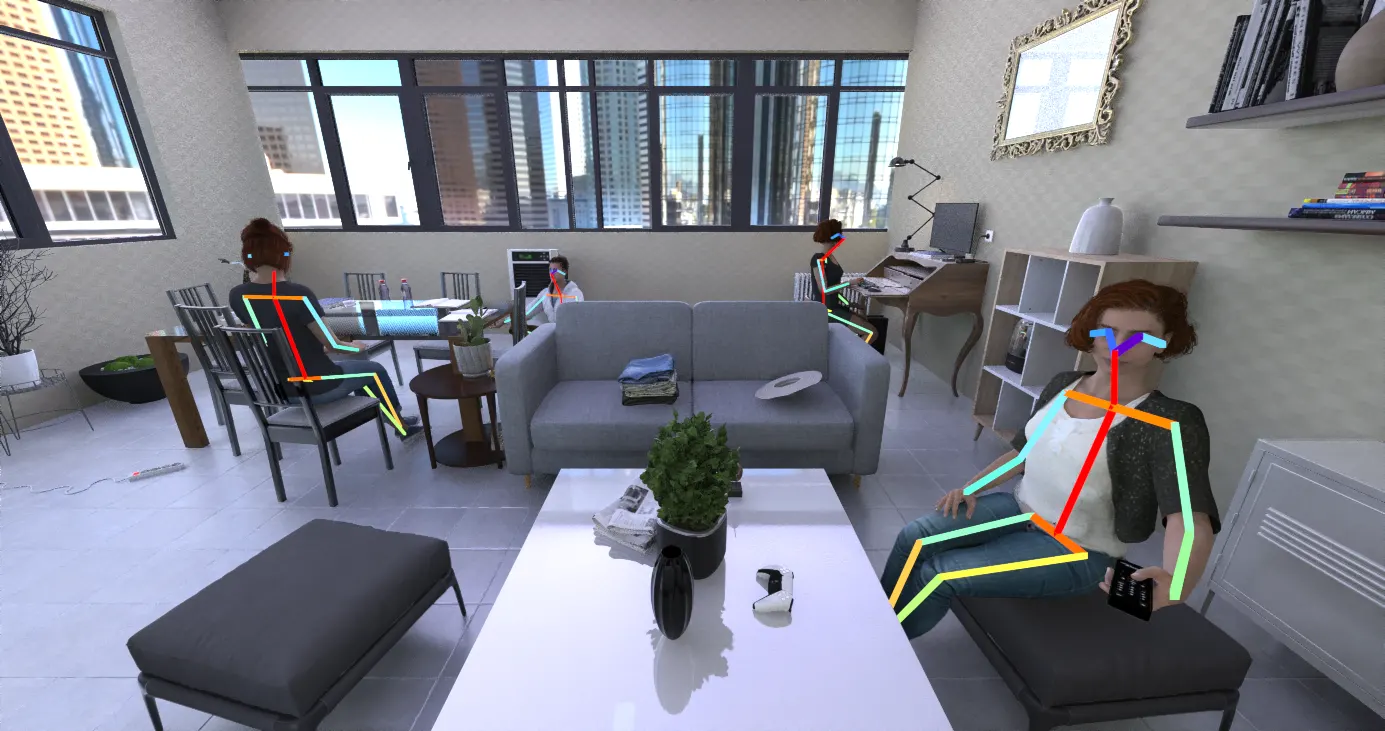
In the “instances” section, human instances are represented with additional parameters to capture their specific characteristics. Each human instance object includes the following parameters:activity: A string containing the taxonomy of the activity performed by the person.pose_2d: An array of 2D joint positions and visibility information. Each joint object contains the following parameters:joint_name: The name or identifier of the joint.position: The 2D position coordinates [x, y] of the joint in the image, specifying its pixel location.visibility: A visibility value indicating the visibility or occlusion status of the joint in the image. It can take values such as 0 (not in the image), 1 (in the image bounds but occluded), or 2 (visible in the image).
human_3d_id: The identifier of the corresponding 3D human instance in the “humans_3d” section.
3D instances (bounding boxes)
The “instances_3d” section contains 3D annotations and information about object instances in the scene. Each 3D instance object includes the following attributes:id: The unique identifier of the 3D instance. This identifier serves as a reference for the 3D object instance across multiple views. In the “instances” section, for each view where the 3D instance is visible, there will be a corresponding block with abox_3d_idthat matches theidof this 3D instance. This allows for easy association and linking of the 2D instances to their corresponding 3D annotations.path: The path of the object instance in the taxonomy.translation: The translation coordinates [tx, ty, tz] of the instance centroid in 3D space.orientation: The orientation quaternion [qx, qy, qz, qw] of the instance.scale: The scale factors [sx, sy, sz] of the instance.
Human 3D pose
The “humans_3d” section provides 3D annotations and information about human instances in the scene. Each human instance object includes the following parameters:id: The unique identifier of the 3D human instance. This identifier serves as a reference for the 3D human instance across multiple views. In the “instances” section, for each view where the 3D human instance is visible, there will be a corresponding block with ahuman_3d_idthat matches theidof this 3D human instance. This allows for easy association and linking of the 2D instances to their corresponding 3D annotations.posture: The posture of the human instance, indicating the general pose or position of the human (e.g., standing, sitting, walking, etc.).pose_3d: An array of joint positions and visibility information in 3D space. Each joint represents a specific part of the human body, such as the nose, eyes, ears, shoulders, elbows, wrists, hips, knees, and ankles. Each joint object contains the following parameters:joint_name: The name or identifier of the joint.translation: The translation coordinates [tx, ty, tz] of the joint in 3D space, specifying its position relative to the global coordinate system.
Table of Contents
Content
Taxonomy
The taxonomy is a fundamental classification system that organizes AI Verse’s collection of over 5,000 high-quality 3D models. Each 3D model is assigned a specific path within the taxonomy, consisting of its superclass, class, and subclass. The taxonomy is a powerful tool used for both scene construction and dataset labeling.The Philosophy: Leveraging Variability for Better AI Models
The taxonomy serves as the backbone for promoting variability in your synthetic datasets, which, in turn, enhances the performance of AI models trained on them. By using the taxonomy, you can specify instances of objects to be placed in scenes and images with greater flexibility. For instance, if you request instances of “furniture.chair” (superclass furniture, class chair) to be included in a scene, the dataset generation engine can populate the scene with various types of chairs, such as office chairs, lounge chairs, or bar stools, based on available subclasses. This capability results in more diverse and representative datasets. Moreover, the taxonomy plays a critical role in generating proper labels for your datasets. As each 3D model in the taxonomy has a specific path, it becomes straightforward to infer accurate labels for the synthetic data created during the generation process.
Objects
In AI Verse’s dataset designer, you have the power to enrich your datasets with diverse and dynamic content by adding randomized object collections. A collection is a group of 3D models defined by specific categories in our taxonomy, along with a desired count. For instance, you can create a collection that includes ‘4 instances of appetizers or salad bowls from the food category.’
When you create a dataset, our system generates random 3D scenes for you. Within these scenes, objects from your collection are placed in a way that matches your specified count and the chosen taxonomy subtrees. For example, a generated scene might include 3 different appetizers and 1 salad bowl, creating a variety of combinations and enriching your dataset with diverse content.”
Support Surfaces
In the dataset designer, certain objects possess the ability to act as support surfaces. These support surfaces, such as tables, shelves, bookcases, and even chairs and sofas, can logically hold or host other objects. When adding randomized object collections to your dataset, you have the option to specify one or more random support surfaces for them. This allows you to create more realistic and contextually relevant scenes, or to model a certain use case with your generated data.
For example, you can choose to include ‘4 instances of appetizers with support surface coffee tables.’ This means that the appetizers in the scene will be placed on coffee tables, creating a natural and realistic arrangement.
To simplify this process, each object, superclass, class, or subclass in the taxonomy have default support surfaces (affinities) defined. For instance, ‘prop.decorative’ is a subclass consisting of decorative objects, and it is pre-defined to be placed on support surfaces like ‘furniture.coffee_table’ and ‘furniture.shelves,’ ensuring that objects are placed in suitable and visually coherent positions.”
Special Objects
Certain objects have unique characteristics and placement requirements. For example:
- Doors/Windows: Doors and windows are structural elements of a room, and they don’t adhere to traditional support surface placement. When a user adds a collection of doors or windows to a batch, the scenes in that batch will have their structure overridden to include the doors and windows as requested.
- Lamps: Lamps are special objects that provide lighting in the scene.
- Objects that can hold the camera (Object POV): Certain objects, like TVs, laptops, home assistants, are equipped to hold the camera during image capture, allowing for unique and dynamic perspectives. When activating the “Object POV” mode for camera placement, those objects will be available as options.
Activities
Activities in AI Verse’s dataset designer refer to the actions and interactions performed by human actors within scenes, and range from working, reading, watching TV, eating, cooking. They include a wide range of postures, movements, and scenarios and can be added to increase realism or directly to model specific use cases including those activities.
Activity Locations
Activity locations define where the actors are positioned in the scene. Each activity location is determined by combining a specific posture with suitable surroundings. For example, “sitting at a desk” combines the “sitting” posture with the “desk” surroundings.
Environments
Environments serve as pre-defined types of rooms that provide context and streamline the scene and image generation process. Each environment represents a specific setting, such as living rooms, bedrooms, offices, meeting rooms, kitchens, studios, hallways, and more.
By selecting an environment for a batch, users can quickly generate scenes and images that match the specified context. This avoids the need for users to manually insert collections of objects related to that environment, as the data generation engine will intelligently handle the placement and arrangement of compatible objects and activities.
Environments also play a vital role in filtering out incompatible activities and objects. For instance, it would not be feasible to have “furniture.bed” in a hallway or the activity “food_drink.cook.stove.hold_pan” in a bedroom. The defined environments ensure that only suitable content is combined to create realistic and contextually appropriate scenes.
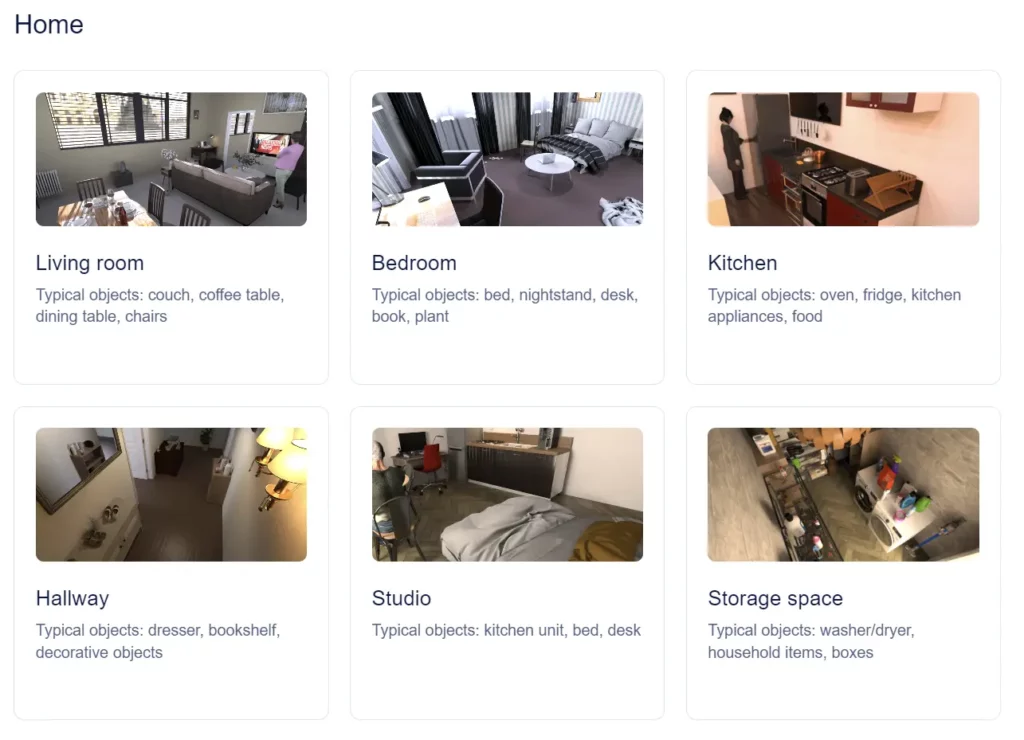
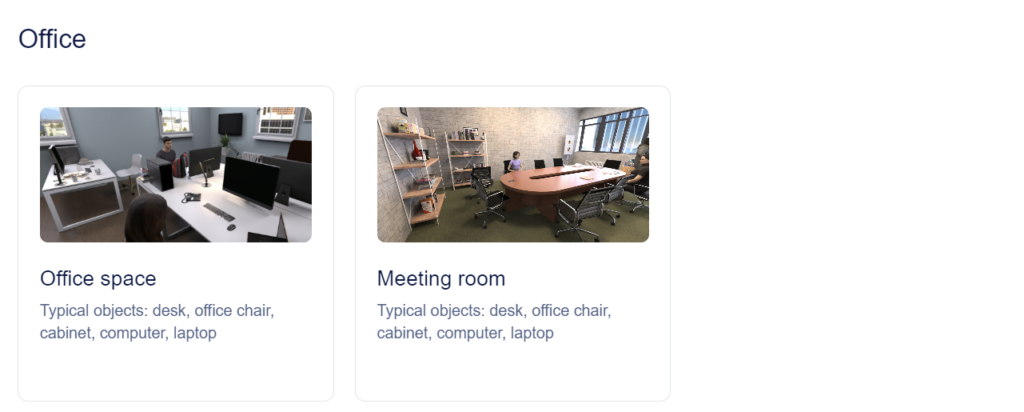
Table of Contents
Pricing & Billing
Pricing
Basics of Pricing
At its core, the pricing is based on a per-image model, determined by several variables that you define during the dataset creation process. Several elements come into play when determining the price of your synthetic dataset:- Labels: Different types of labels incur different costs per image. These include 2D boxes, segmentation masks, 3D boxes, 2D/3D human pose, camera pose, depth/normal maps, and albedo/lambertian reflectance.
- 8-bit or 16-bit: You can choose to generate RGB and depth images in either 8-bit or 16-bit (EXR) formats, each having a distinct price per image.
- Image Resolution and Custom Resolution: The number of pixels per image (width times height) plays a role. While VGA images (640×480) are assigned a base multiplier of 1, this multiplier increases as resolution thresholds are crossed.
Estimating Dataset Price
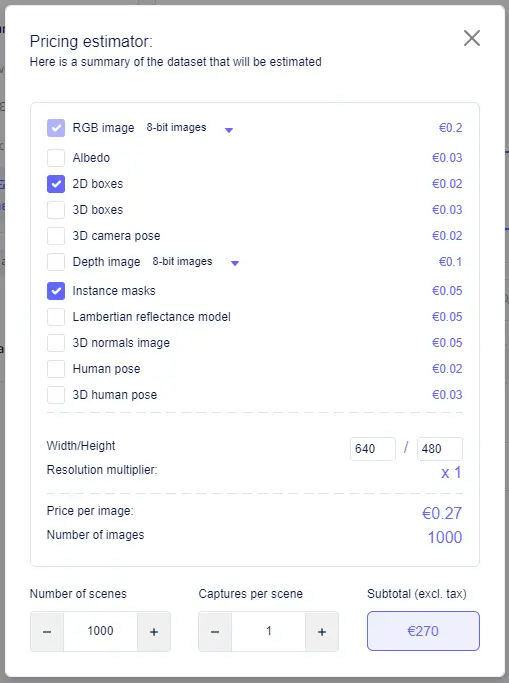
Estimating the cost of your dataset is made simpler with the help of the price estimator tool. Here’s how you can do it:
- Select labels: Use checkboxes to indicate the label types you plan to include in your dataset.
- Choose RGB and depth map format: Utilize the drop-down menus to specify whether you want to generate 8-bit or 16-bit RGB and depth maps.
- Price per Image: Based on your selections, the tool will calculate the price per image.
- Estimate dataset cost: Now, input the number of scenes and views per scene. The tool will then estimate the total cost of your dataset, excluding taxes.
With this estimator, you can get a clear idea of what to expect before you proceed to generate your synthetic dataset.
Dataset cost
The size of your dataset is calculated by multiplying the number of scenes by the number of captures per scene. It’s important to note that datasets can generate fewer images than initially requested, particularly in cases of errors or when a batch is interrupted. In such cases, only the successfully generated images are considered for charges. Here’s how the billing process works:- Credits Balance: If there are credits available in your account (or your team’s account), these credits are applied to the subtotal of your expenses before taxes.
- Taxes Consideration: The final price with taxes is calculated only when applicable, which will be explained in detail in the “Billing” section.
Billing
Basics of Billing
Understanding the billing process is crucial for managing your expenses as you create your synthetic datasets. Here’s a rundown of the fundamental aspects you need to be aware of:- Credits: When you sign up for an account, you receive an initial €300 worth of free credits. You can view your credit balance in the Billing & Credits page. If you need more credits, you have the option to add them to your account through a bank/wire transfer, providing an alternative to using a debit or credit card.
- Debit/Credit Card: To facilitate payments, you can link a payment method to your account on the Billing & Credits page. When you launch a dataset, the system will first deduct credits from your balance. If your credit balance is insufficient, the remaining cost will be charged to the registered card.
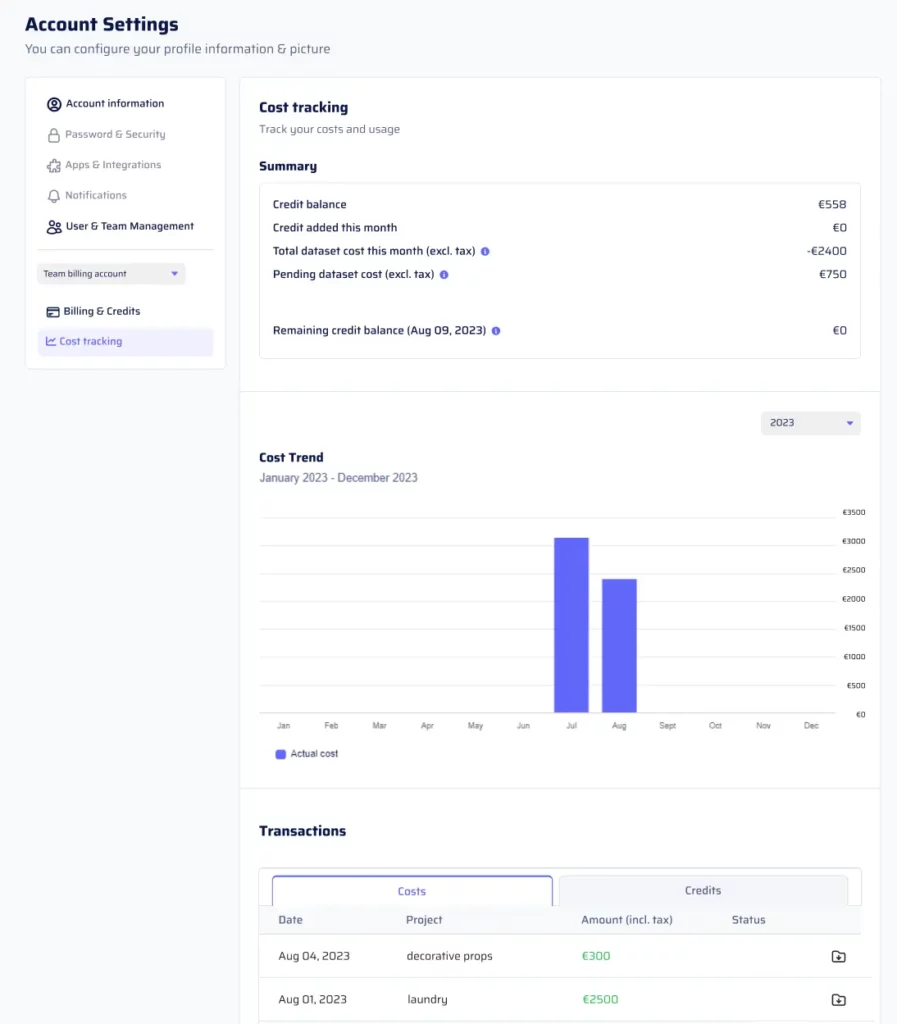
- Cost Tracking: The Cost Tracking page offers comprehensive insights into your billing details. Here, you can access:
- A monthly summary detailing the total dataset cost accrued since the beginning of the month, pending dataset costs, and your remaining credit balance.
- A bar plot illustrating the trend of costs over the past months.
- A transactions table, providing information about each dataset, including date, project title, amount (including tax), and a link to download PDF receipts for transactions that involved card payments.
Dataset Billing Process
Understanding the sequence of billing events during and after dataset generation is essential for transparency in your expenses:- Initial Hold When Launching Dataset: When you initiate a dataset, an initial hold (authorization for the amount) is placed on the card for the calculated cost. If you have sufficient credits, they are used first. If your credit balance is insufficient, the rest of the cost is covered by the registered card.
- Final Charge After Data Generation: Once the data generation is completed, the final charge is processed. If any images are missing due to errors or dataset interruption, the card amount is reduced first. If necessary, credits are then used to cover any remaining balance.
Team Billing
For collaborative endeavors and streamlined billing, teams provide a cohesive billing account for multiple users. Here’s what you need to know about team billing:- Teams Overview: A team acts as a unified billing account for multiple users, managed by a team admin who can invite other team members. The team admin exercises the same billing management functionalities as in a personal account, including credit management and registered cards for payments.
- User Limitation: Each user can be part of only one team at a time.
- Creating a Team / Inviting Members: Team creation and member invitation are both facilitated through the User & Team Management page. To form a team, create it first and then invite members using their registered email addresses. It’s important that the invited users already have existing accounts on AI Verse.
- Being a Team Member: For team members, all dataset charges are directed to the team account, which can be funded using credits or a registered card. Similar to personal billing, if the team has insufficient credits and no registered card, launching a dataset won’t be possible until the issue is resolved.
- Team Admin Role: A team admin, similar to a personal account holder, can add payment methods, oversee costs through Cost Tracking, and manage team members. This includes the ability to remove team members using the Team members table in User & Team Management. If necessary, the team admin can also disband the team, at which point all users revert to being billed to their personal accounts.